 How-to
7 Steps to Document Storm Damage for Insurance Claims
Last Updated: October 25, 2026
Quick Summary
To document storm damage for insurance claims, stay on the ground and photograph each side of your home with wide shots, close-ups, and timestamps, then back up and name every file. Report the damage promptly, make only temporary repairs, and keep all receipts and a written log of every insurer contact.
- Check for downed power lines and sagging ceilings before you photograph anything.
- Read your policy's deductible, coverage limits, and claim reporting deadline before filing.
- Use a date-first file naming convention and back up files in at least two places.
- Photograph each damaged item and its serial number before discarding it.
- Make only temporary repairs before the adjuster inspects, and save every receipt.
Table of Contents
- Put Safety First Before You Document Storm Damage
- Review Your Insurance Policy Before You File
- How to Take Photos for an Insurance Claim: A Shot List
- Build Your Storm Damage Insurance Claim Checklist
- Insurance Claim Documentation Examples That Hold Up
- Temporary Repairs After Storm Damage Without Hurting Your Claim
- Book a Free Roof Inspection With Roof King
- Frequently Asked Questions
Put Safety First Before You Document Storm Damage
Learning how to document storm damage for insurance claims starts with one rule: no photo is worth an injury.
Stay on the ground. Photograph what you can see from a safe distance, and leave the roof surface to a professional.
Storm damage is physical harm to a property caused by wind, hail, falling limbs, or water intrusion. Insurance adjusters rely on visual proof, so your safety and your evidence go hand in hand.
Before you touch anything:
- Check for downed power lines and call the utility if you see them
- Watch for sagging ceilings or cracked rafters
- Keep children and pets away from debris
- Wear gloves and closed-toe shoes near broken glass
If a section of roof is visibly caving, get out and call for help. Ready.gov storm safety guidance covers what to do after a severe weather event.
Review Your Insurance Policy Before You File
Read your policy before you file, not after. The declaration page tells you your deductible, your coverage limits, and how long you have to report a claim. Most homeowners insurance policies cover storm damage, but the details decide how much proof you need.
Open your policy and find these items:
- Your deductible amount
- Whether wind and hail are covered separately
- The claim reporting deadline
- Your duties after a loss, often listed in a section with that exact title
That last item matters most. Most policies require you to report damage promptly and take reasonable steps to prevent further damage (Settling insurance claims after a disaster). Miss either step and your claim can shrink.
If you'd rather have help reading the fine print, our team walks homeowners through roof insurance claims every week.
How to Take Photos for an Insurance Claim: A Shot List
Good claim photos follow a simple pattern: wide shots show where the damage sits, close-ups show what it is, and timestamps show when you captured it. Work from the ground outward and shoot more than you think you need. The goal is evidence an adjuster can verify without calling you back.
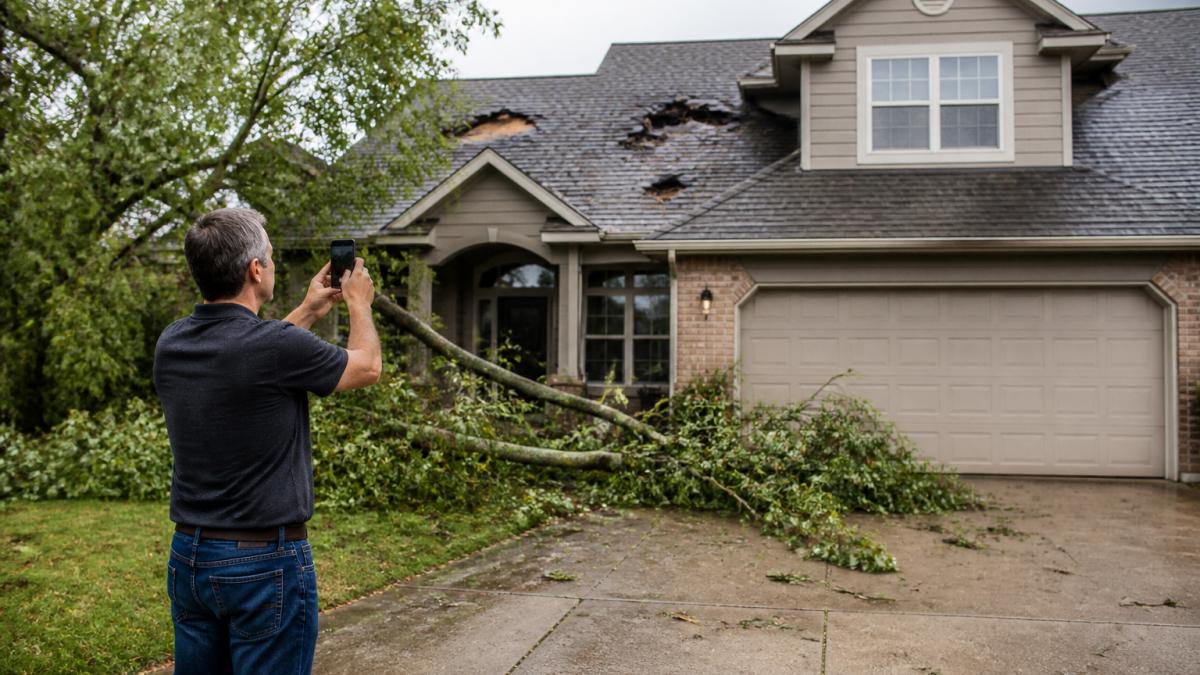
Here's the shot list we hand to clients:
- One wide establishing shot of each side of the house, taken from the street or yard so the whole elevation is in frame
- One wide shot of the whole yard, showing fallen limbs and debris fields
- Close-ups of missing shingles, dents, cracks, and lifted flashing
- Close-ups of window, siding, gutter, and downspout damage
- Shots of outbuildings, fences, and vehicles
- A scale reference, a ruler, tape measure, or coin, next to hail dents and cracks
- One photo of the home's address marker or a piece of mail in frame to tie the set to the property
Wide Shots, Close-Ups, and Timestamps
Wide shots give the adjuster context. Close-ups prove severity. Timestamps prove the damage existed before cleanup crews arrived.
Turn on location and date settings in your phone camera. If your phone doesn't stamp photos, hold a sheet of paper with the date in the frame for the first shot of each set. Many carriers also accept video walkthroughs, which capture angles a single photo misses.
A video walkthrough works best when you narrate it: state the date, the room or elevation, and what you are seeing as you pan slowly. Walk one continuous path, front yard, then each elevation, then interior rooms, rather than jumping around. Slow pans beat fast sweeps because motion blur ruins detail.
Name, Store, and Back Up Every File
This is where most homeowners lose evidence without realizing it. Photos buried in a camera roll with names like IMG_4471 are hard to match to a claim, and a lost or broken phone can wipe the whole set.
Use a simple naming convention that sorts itself: date first, then location, then subject. For example, 2026-10-25_front-elevation_missing-shingles.jpg. The date-first format keeps files in chronological order in any folder view.
Build a folder structure on your computer or cloud drive:
Claim-[number]as the top folder01_Photoswith subfolders for exterior, interior, and contents02_Videofor walkthroughs03_Receiptsfor purchases and temporary repair costs04_Estimatesfor contractor bids05_Logfor your written communication record
Back up the folder in at least two places, a cloud drive and a physical drive, and keep a copy you can share with the adjuster without handing over your only set. If you use a cloud service, confirm the timestamps survive upload; some services rewrite file dates.
Keep a one-page documentation log alongside the files. For each entry, note the date, time, what was photographed, and where it was taken. That log turns a pile of images into a story the adjuster can follow.
For a deeper walkthrough, see our guide on how to document roof storm damage step by step.
Build Your Storm Damage Insurance Claim Checklist
A storm damage insurance claim checklist keeps you from missing proof your adjuster will ask for. Build it on paper or in a notes app, and check off each item as you go.
Book my free Roof Quote Today →
| Checklist Item | What to Capture | Why It Matters |
|---|---|---|
| Photos and video | Wide shots, close-ups, timestamps | Proves damage existed |
| Itemized inventory | Damaged items, brand, age, value | Supports contents payout |
| Proof of ownership | Receipts, invoices, photos | Confirms what you owned |
| Repair estimates | Written bids from contractors | Sets the repair baseline |
| Communication log | Dates, names, claim numbers | Documents every contact |
| Temporary repair receipts | Materials, labor costs | Often reimbursable |
Keep a running log of every call with your insurance company. Write down the date, the representative's name, and what was agreed. If a dispute comes up later, that log is your best evidence.
Build a Contents Inventory That Survives Scrutiny
The checklist table is the skeleton. The contents inventory is where most claims are won or lost, and it is the step most homeowners rush. A line that says "TV, damaged" gives the adjuster nothing to value.
Build the inventory room by room, and for each damaged or missing item record:
- A short description including brand and model where you know it
- Approximate age and condition before the storm
- Where it was located in the home
- Purchase evidence, receipt, bank statement, warranty card, or a photo of the item in use
- A replacement estimate from a current retail listing or written quote
Photograph each item before you discard it, and photograph the model or serial number label when it is accessible. Serial numbers are the strongest proof of ownership because they tie a specific item to you.
If receipts are gone, secondary evidence still counts. A dated photo of the item in your home, a warranty registration email, a credit card statement line, or a manual with your name on it all help establish that you owned the item and roughly when you bought it.
For a full documentation walkthrough, read our roof insurance claim documentation guide.
Insurance Claim Documentation Examples That Hold Up
Strong documentation tells a clear story from first photo to final receipt. Here's what a solid record looks like in practice.
Example 1: Hail claim. A homeowner photographs the driveway first, showing golf-ball-sized hail piled against the garage door. Then close-ups of shingle bruises with a tape measure in frame.
Example 2: Wind claim. Wide shots of three missing shingle patches, a close-up of lifted flashing, and a photo of the fallen oak limb that caused it.
Example 3: Water claim. Photos of the ceiling stain, a moisture meter reading, and a written plumber's note ruling out a pipe leak.
The pattern holds across all three: context, detail, and proof of cause. Adjusters see thousands of claims. Make yours easy to follow and it moves faster.
Temporary Repairs After Storm Damage Without Hurting Your Claim
Temporary repairs protect your home and your claim, as long as you document the damage first. Most policies require you to prevent further damage, and many reimburse reasonable costs (Settling insurance claims after a disaster).
Photograph everything before you touch it. Then:
- Tarp the roof and keep the receipt
- Board broken windows
- Move valuables away from leaks
- Save every invoice for materials and labor
Don't make permanent repairs before the adjuster inspects. A new roof installed before the inspection can look like you're hiding the damage. Keep it temporary, keep it documented, and keep your receipts.
Watch out: throwing away damaged materials before the adjuster sees them can cost you the claim on those items.
Book a Free Roof Inspection With Roof King
Documentation gets your claim moving. A professional inspection gets it across the finish line.
At Roof King LLC, we've helped homeowners across Lenawee and Jackson counties document storm damage and work through the claim process. Our team provides comprehensive insurance claim assistance, from photo documentation to adjuster meetings. We also offer a Storm-Ready Roof inspection and maintenance package for homeowners who want to catch problems before the next storm.
If you're weighing whether to hire help, our guide on hiring roofers for insurance claim assistance covers what to ask. When you're ready to move, contact us and book a free roof inspection with Roof King.
Frequently Asked Questions
What should I document after storm damage before filing an insurance claim?
Photograph and video every affected area before cleanup: roof shingles, siding, windows, gutters, fallen trees, outbuildings, and vehicles. Capture wide shots showing the whole side of the house, then close-ups of individual damage. Note the date and time, and keep a written log of what you found and when. Save receipts and proof of ownership for damaged belongings. This storm damage evidence gives your claims adjuster a clear record and supports your covered damage.
Should I contact my insurance company before making temporary repairs?
Report the claim first when you can, then take reasonable steps to prevent further damage. Most homeowners insurance policies require mitigation, so tarping a leaking roof or boarding a broken window is expected. Keep every receipt for materials and labor, photograph the damage before and after the temporary repair, and tell your claims adjuster what you did. Avoid permanent repairs until the adjuster inspection is complete, since permanent work before review can complicate your claim.
How do I take photos for an insurance claim that actually get accepted?
Start wide, then move close. Photograph the entire exterior from several angles so the adjuster can orient each close-up. Include a ruler or tape measure next to hail dents or cracked shingles, and turn on timestamps or note the date and time in a log. Shoot video walking the property for context. Back up everything to cloud storage the same day. Organized, dated visual evidence is one of the most common reasons a storm damage claim moves smoothly instead of stalling.
What records should I keep for a storm damage insurance claim?
Keep your policy number, the claim number, and a communication log of every call and email with your insurance company. Save repair estimates, contractor invoices, receipts for temporary repairs, and proof of ownership for damaged personal belongings. Store photos and videos in a dated folder with a cloud backup. If damage develops later, add new dated evidence. A complete storm damage insurance claim checklist keeps your records ready if the adjuster asks for supporting evidence.
Storm damage is stressful, and the paperwork can feel worse than the storm itself. Roof King LLC takes the documentation burden off your plate with honest assessments, clear communication, and full support through the insurance claim process. Get started with Roof King LLC and protect your home with workmanship built to last through every season.